Learn how to marble your old gin bottles and glasses with this fabulous guide!
Apr 11, 2023
Whether you are an arts and crafts guru, someone looking for an easy way to upcycle their old gin bottles, or you’re just looking for a fun way to beat the boredom, this is crafting guide is perfect for you.
Marbling your gin bottles with ink or nail varnish might seem like an upcycling activity reserved for the pros, but it’s actually really quick and easy to do at home - you just need the right know-how and some choice equipment (luckily, the things you need for this guide are all items you probably have at home already). And once you get the hang of it, there are so many fun ways to show off your colourful gin bottles - creating unique and beautiful gin bottle lanterns and candle holders, to name just two.
So what are you waiting for? Check out this easy guide and get crafting. Those gin bottles won’t marble themselves!
Shop our wide range of spirits & more


What you’ll need:
Empty glass gin bottles ready for upcycling
Rubbing alcohol (available online)
Glossy spray paint (available online) - optional
Marbling inks (available online) or nail varnishes - in a couple of your favourite colours
A plastic bucket - deep enough for you to dip your bottle in
A wooden skewer
Wax paper or parchment paper
Method:
Tip: If this is your first time, we’d advise trying this out on an old plastic bottle or something similar before diving straight in with your favourite gin bottle, just to get the hang of things first.
- Find a selection of gin bottles in a range of shapes and sizes that you are looking to upcycle.
- Clean the outside of your bottle with dish soap and warm water - removing any labels along the way.
- Wipe the bottle down with a paper towel soaked in rubbing alcohol to remove any sticky or oily residue. Leave to dry.
- If you prefer to marble straight onto the glass you can skip ahead to Stage 5 or you could paint your bottle using white glossy spray paint - marbling onto a spray-painted bottle gives the marbling a bolder, brighter and more defined finish. For the latter option, take the bottle outside or into a well-ventilated area. Cover your work surface with newspaper, then set the bottle on top. Shake the can for a few seconds and then apply a light even coat.
- Let the paint dry, then apply a second coat, if needed. It is always better to apply several light coats of paint rather than a single thick coat.
- Fill a plastic bucket with room temperature water - be sure to choose a bucket that is taller than your bottle. The water needs to be deep enough so that you can dip your bottle inside without the bottle touching the bottom of the bucket
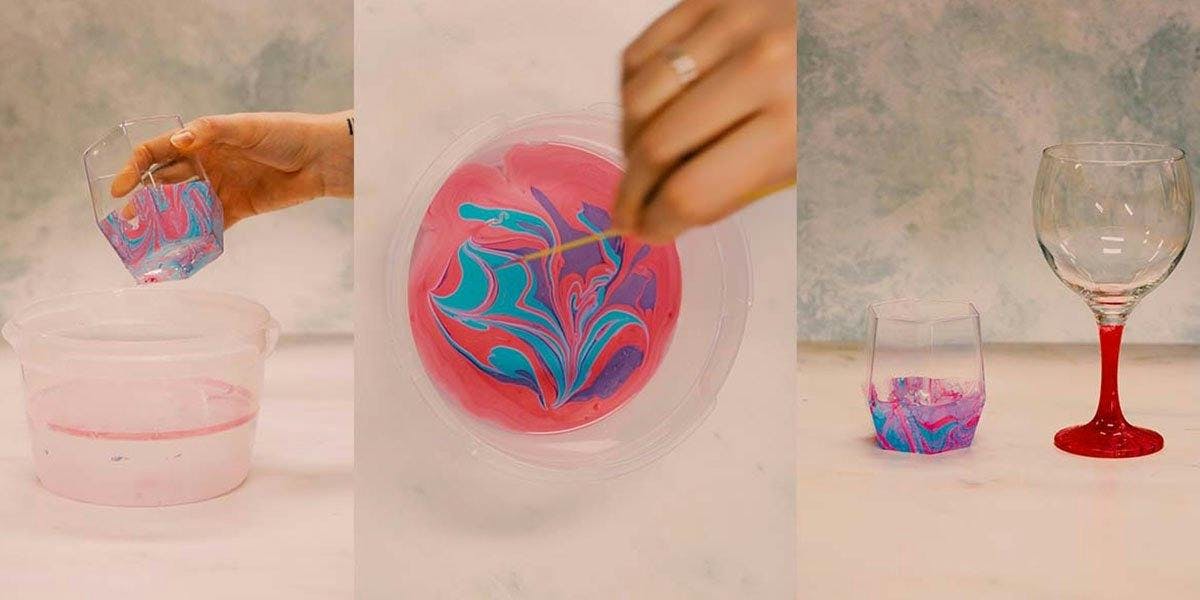
- Pour a few drops of marbling ink OR drops of nail varnish into the water. You can use as many colours as you want, but 1 or 2 usually work best. How much you decide to put in is up to you; the more you add, the more marbling you will get.
- Use your wooden skewer to gently swirl the colours of the ink or nail varnish together and then move quickly onto the next step so that the inks/nail varnishes don’t dry on the surface of the water.
- Slowly dip the bottle into the water, and then pull it out. Depending on how much of the bottle you want to be marbled, you may only want to dip the bottle in half-way or a quarter of the way. Tip: Hold the bottle by the very tip and don’t let any water get inside the bottle.
- Set the bottle onto a sheet of wax paper or parchment paper so that it can dry. After about 10 minutes, tap the marbled design to make sure that it is dry, then wipe off any excess water with a paper towel. If the bottle feels tacky, it is not dry and you should wait a bit longer before wiping it.
- Pick up the excess ink or nail varnish from the water surface with a wooden skewer. Do not pour the water into the sink or you’ll risk clogging it. Instead, swirl a wooden skewer in the water to catch the excess ink or nail varnish and then throw it away. Once all of the ink or nail polish is out of the water, you can pour the water away.
- Repeat as many times on as many gin bottles and with as many different colour combinations as you’d like!
- Share your marbled ginny masterpieces with us in our Facebook Group, Craft Gin Clubbers, or across social media tagging @craftginclub. We love to see what designs you come up with!
Find a selection of gin bottles in a range of shapes and sizes that you are looking to upcycle.
Clean the outside of your bottle with dish soap and warm water - removing any labels along the way.
Wipe the bottle down with a paper towel soaked in rubbing alcohol to remove any sticky or oily residue. Leave to dry.
If you prefer to marble straight onto the glass you can skip ahead to Stage 5 or you could paint your bottle using white glossy spray paint - marbling onto a spray-painted bottle gives the marbling a bolder, brighter and more defined finish. For the latter option, take the bottle outside or into a well-ventilated area. Cover your work surface with newspaper, then set the bottle on top. Shake the can for a few seconds and then apply a light even coat.
Let the paint dry, then apply a second coat, if needed. It is always better to apply several light coats of paint rather than a single thick coat.
Fill a plastic bucket with room temperature water - be sure to choose a bucket that is taller than your bottle. The water needs to be deep enough so that you can dip your bottle inside without the bottle touching the bottom of the bucket
Pour a few drops of marbling ink OR drops of nail varnish into the water. You can use as many colours as you want, but 1 or 2 usually work best. How much you decide to put in is up to you; the more you add, the more marbling you will get.
Use your wooden skewer to gently swirl the colours of the ink or nail varnish together and then move quickly onto the next step so that the inks/nail varnishes don’t dry on the surface of the water.
Slowly dip the bottle into the water, and then pull it out. Depending on how much of the bottle you want to be marbled, you may only want to dip the bottle in half-way or a quarter of the way. Tip: Hold the bottle by the very tip and don’t let any water get inside the bottle.
Set the bottle onto a sheet of wax paper or parchment paper so that it can dry. After about 10 minutes, tap the marbled design to make sure that it is dry, then wipe off any excess water with a paper towel. If the bottle feels tacky, it is not dry and you should wait a bit longer before wiping it.
Pick up the excess ink or nail varnish from the water surface with a wooden skewer. Do not pour the water into the sink or you’ll risk clogging it. Instead, swirl a wooden skewer in the water to catch the excess ink or nail varnish and then throw it away. Once all of the ink or nail polish is out of the water, you can pour the water away.
Repeat as many times on as many gin bottles and with as many different colour combinations as you’d like!
Share your marbled ginny masterpieces with us in our Facebook Group, Craft Gin Clubbers, or across social media tagging @craftginclub. We love to see what designs you come up with!