How to turn your gin bottle into de-light-ful décor!
Dec 16, 2017
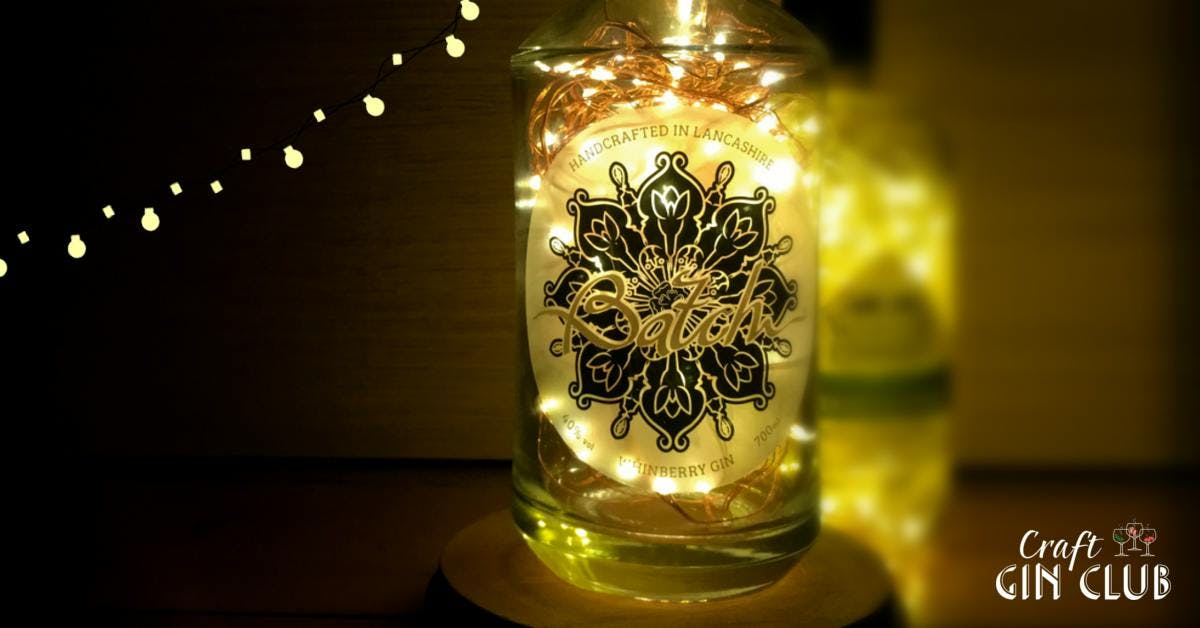
As true gin lovers, we know better than anyone the agony of throwing away a beautiful bottle of gin – even once it’s empty! But with a bit of DIY, you can transform your gin collection into beautiful, fairy light-filled decorations that will glimmer this Christmas and beyond.
Shop our wide range of spirits & more


What You Need
- An empty gin bottle, with cork or cap
- A string of battery-operated fairy lights
- A hot glue gun or tape and scissors
- A drill
- A 10mm, glass-cutting drill bit
- A bowl of cool water
- Safety gloves and goggles
An empty gin bottle, with cork or cap
A string of battery-operated fairy lights
A hot glue gun or tape and scissors
A drill
A 10mm, glass-cutting drill bit
A bowl of cool water
Safety gloves and goggles
What You Do
- In a safe area, away from pets and children, get your safety gear on and set up your workstation. You want your 10mm drill bit inserted, your bowl of water nearby, and the cork out of your bottle and set aside.
- Very slowly, pausing frequently to cool down your drill bit in the water, make a hole in the back of your gin bottle, towards the base. Proceed very carefully, particularly when you get close to breaking through the other side. The last thing you want is to shatter your bottle!
- Once your hole has been made, carefully dispose of any loose glass and wash out your bottle.
- Slide your fairy lights through the hole and pull them up, out the top of the bottle, until you’re stopped by the battery pack. Secure the wire, at the halfway point, to the bottom of the cap or cork using hot glue or tape. If using glue, allow time to dry completely.
- Holding the cap aloft, slide the fairy lights – the strand now folded in half – back into the gin bottle. Adjust as best you can so that the lights seem to fill as much of the bottle as possible.
- Cap your gin, turn on your fairy lights, and enjoy!
In a safe area, away from pets and children, get your safety gear on and set up your workstation. You want your 10mm drill bit inserted, your bowl of water nearby, and the cork out of your bottle and set aside.
Very slowly, pausing frequently to cool down your drill bit in the water, make a hole in the back of your gin bottle, towards the base. Proceed very carefully, particularly when you get close to breaking through the other side. The last thing you want is to shatter your bottle!
Once your hole has been made, carefully dispose of any loose glass and wash out your bottle.
Slide your fairy lights through the hole and pull them up, out the top of the bottle, until you’re stopped by the battery pack. Secure the wire, at the halfway point, to the bottom of the cap or cork using hot glue or tape. If using glue, allow time to dry completely.
Holding the cap aloft, slide the fairy lights – the strand now folded in half – back into the gin bottle. Adjust as best you can so that the lights seem to fill as much of the bottle as possible.
Cap your gin, turn on your fairy lights, and enjoy!