Total flexibility, no commitment
A world of unique, crafted gins
Easy, free and reliable delivery
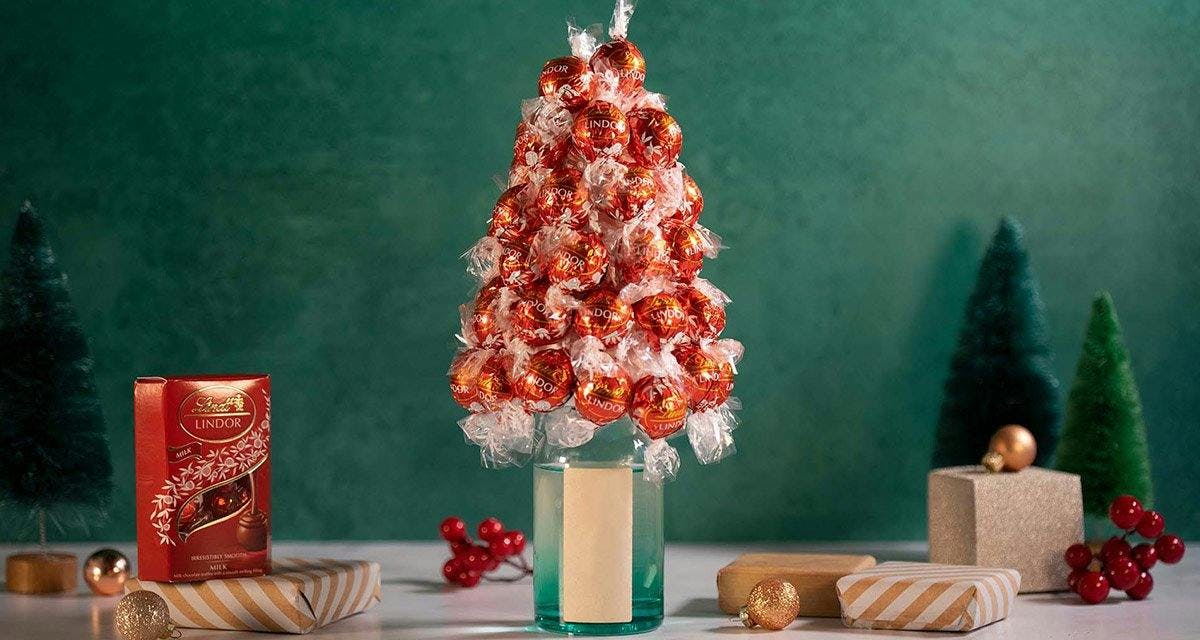
Make the ultimate LINDOR and Gin Chocolate Christmas Tree centrepiece for your festive table!
Dec 7, 2021
If you upcycle your gin bottles (maybe you’ve made your own gin incense diffuser, gin bottle soap dispenser, or candle holder) then this festive gin upcycling idea will be right up your street. Christmas is the perfect excuse to go to town on decorations and make each room in your home look festive and sparkly…
So what do you get if you combine two of our favourite things - gin and Lindt chocolate? This festive LINDOR and Gin Chocolate Christmas Tree show stopper! It’ll certainly add a bit of LINDOR luxe that’ll impress your guests and make your table look gin-credible! The only struggle? Not eating the delicious chocolates before Christmas, of course! And we reckon this would make a brilliant homemade gin gift for your gin pal…
Gin-spired by the adorable box of LINDOR chocolates in our December Gin of the Month box, we got into the Christmas spirit here at Craft Gin Club HQ by making this simple, edible (and wonderfully indulgent!) festive table centrepiece. It’s easier to make than you think - (it’s a Christmas craft no-brainer), so you can get your kids or ginny friends involved too.
Pssst - got a sweet tooth? Be sure to buy an extra box or two so that you have enough to make your centrepiece!
Here’s how to make this festive LINDOR and Gin Chocolate Christmas Tree:

Imagine this ginny beauty sat on your dining table!
What you’ll need to make this gorgeous LINDOR and Gin Chocolate Christmas Tree:
- Toothpicks
- A polystyrene triangle cone - there’s lots available on Amazon here (or craft stores like Hobbycraft).
- 2 or 3 boxes of LINDOR chocolates (you can be as creative as you want with multiple colours and flavours!)
- An empty gin bottle (pick a pretty one so that your centrepiece really wows)
- A knife (to cut a circular hole in the bottom of you cone, so it can sit on top of your gin bottle)
- Optional Tweezers (to help you push the LINDOR balls flush to the cone)
Toothpicks
A polystyrene triangle cone - there’s lots available on Amazon here (or craft stores like Hobbycraft).
2 or 3 boxes of LINDOR chocolates (you can be as creative as you want with multiple colours and flavours!)
An empty gin bottle (pick a pretty one so that your centrepiece really wows)
A knife (to cut a circular hole in the bottom of you cone, so it can sit on top of your gin bottle)
Optional Tweezers (to help you push the LINDOR balls flush to the cone)
Step by step guide to making your LINDOR and Gin Chocolate Christmas Tree
- Look at the nozzle of your gin bottle to gauge its size - and draw a circle on the bottom of the polystyrene cone (marking the circumference of the nozzle) to match. This will ensure that the polystyrene cone will sit flush on top of your gin bottle.
- Using your knife, cut the circular shape out of the base of your polystyrene cone - you only need to cut between 1 to 2 inches deep to ensure that this will sit securely on top of your gin nozzle. Top tip: it’s better to have marked the circumference slightly smaller than to have it too big, to ensure the cone won’t move around. Adjust, and make bigger, as necessary.
- Place your cone on top of the gin bottle, ensuring it is sturdy and safe.
- Once your cone is attached to the top of your gin bottle, it's time to add the LINDOR chocolates to your toothpicks. Attach 1 LINDOR ball to 1 toothpick. Pierce one side of the chocolate and slide it down, ensuring the chocolate is on the end of the toothpick and not piercing both sides of the chocolate. Top tip: for a streamlined, neat look, make sure the LINDOR logo is upright.
- Now it’s time to attach your chocolates! We advise starting at the bottom of the cone, and working your way around, to ensure there are no gaps. Pierce the cone with a toothpick (with the LINDOR ball attached to the end) and use the tweezers to ensure they are secured firmly into the cone. Top tip: the tweezers are much thinner than your fingers so it takes the difficulty out of getting the chocolates sitting as flush to the cone as possible!
- Repeat until the entire base is covered. Ensure all LINDOR chocolates are secure and add chocolates in any remaining gaps - the less of the cone on show - the better!
- If you’d like to add a tree topper (like a small star, for example) then go ahead. You could also stick a toothpick vertically into the top and place a chocolate on top.
- Et voila!
Be sure to show us your ginny creations over on our Facebook page!
Look at the nozzle of your gin bottle to gauge its size - and draw a circle on the bottom of the polystyrene cone (marking the circumference of the nozzle) to match. This will ensure that the polystyrene cone will sit flush on top of your gin bottle.
Using your knife, cut the circular shape out of the base of your polystyrene cone - you only need to cut between 1 to 2 inches deep to ensure that this will sit securely on top of your gin nozzle. Top tip: it’s better to have marked the circumference slightly smaller than to have it too big, to ensure the cone won’t move around. Adjust, and make bigger, as necessary.
Place your cone on top of the gin bottle, ensuring it is sturdy and safe.
Once your cone is attached to the top of your gin bottle, it's time to add the LINDOR chocolates to your toothpicks. Attach 1 LINDOR ball to 1 toothpick. Pierce one side of the chocolate and slide it down, ensuring the chocolate is on the end of the toothpick and not piercing both sides of the chocolate. Top tip: for a streamlined, neat look, make sure the LINDOR logo is upright.
Now it’s time to attach your chocolates! We advise starting at the bottom of the cone, and working your way around, to ensure there are no gaps. Pierce the cone with a toothpick (with the LINDOR ball attached to the end) and use the tweezers to ensure they are secured firmly into the cone. Top tip: the tweezers are much thinner than your fingers so it takes the difficulty out of getting the chocolates sitting as flush to the cone as possible!
Repeat until the entire base is covered. Ensure all LINDOR chocolates are secure and add chocolates in any remaining gaps - the less of the cone on show - the better!
If you’d like to add a tree topper (like a small star, for example) then go ahead. You could also stick a toothpick vertically into the top and place a chocolate on top.
Et voila!
Be sure to show us your ginny creations over on our Facebook page!
In partnership with @LindtUK.